
Why do I prefer doing my own oil changes? Well with longer maintenance cycles and less stuff breaking down, gives me something to do on the car, and an excuse to spend time in the garage. Plus, I know it is done right - seen too many cars driving on the road with panels hanging down and heard too many stories of stripped drain plugs, too much oil, wrong type of oil, too little oil etc. While, I trust my Nissan and Infiniti dealerships, I don't trust quick change places. Lastly, I know what is oil is going in and I can usually do it a a fraction of the cost of any other place's cost of using fully synthetic oil. It is really a $30 cost of prevention.
 |
Draining the Oil
|
Step 1: Buy Necessary Items:
You will need:
- 5 and 1/8qt of 5W30 engine oil are needed for an oil change with filter change. I prefer Mobil 1 Full Synthetic 5W30 Engine Oil. I pick it up at Walmart for $24.40 for a 5qt jug. It is enough for an oil change without needing the 1/8qt as not all the oil
- 1x Nissan Engine Oil Filter Part # 15208-65F0E, that ranges anywhere from $6 to $8 from your dealership. I prefer using the OEM Nissan one to ensure warranty, and also because it contains the relief valve inside. There are better aftermarket filters, I have used Nissan ones for 15 years without an issue. Do not use 15208-65F0C, that is an old part number that has been discounted and has a cardboard end-cap and it's made in China.
- 1x drain plug crush washer part # 11026-01M02
You will need:
- 10mm socket (better if magnetic)
- 14mm socket or 14mm wrench
- Appropriate socket drive, preferably ratcheting
- 30mm socket extension
- Short flathead screwdriver
- Standard Nissan Oil filter Wrench
- Torque Wrench (not necessary)
- Oil drain pan
- Wipes or rags
- Low clearance hydraulic jack
- 1x Jack Stand (up to 1.5 Ton)
- Funnel
 |
| My favorite oil change tools |
Step 3: Prep Vehicle
- Park on a level surface
- If not already warm, warm Engine to normal operating temperature, rev it a few times
- Tune to a good radio station :)
- Use either the jacking point behind the drivers side front wheel and place the jack stand on the suspension member. Or if using a floor jack, then jack up the Q50 using the suspension member and put the jack stand as a safety on the jacking point.
 |
| Jacking up the driver's side. |
At this point, the oil can be drained as the drain plug is exposed and the filter can be changed by removing the 2 bolts that hold a flap in the engine cover. The filter can be accessed from the flap. I prefer not to drain and replace the filter this way. It leaves mess and I spend more time cleaning it up than simply removing the engine cover with my mini impact wrench.
 |
| Oil Filter access flap |
Step 4: Remove Bottom Engine Cover
Remove all 10 black screws (yellow circle), 4 silver screws (blue circle) and 3 plastic (red circle) fasteners from the engine bottom cover. Then remove the cover by pulling it down.
 |
| Removal of Engine Cover |
Step 5: Draining the Oil
Remove the engine oil filler cap from inside the hood.
 |
| Engine Oil Filler |
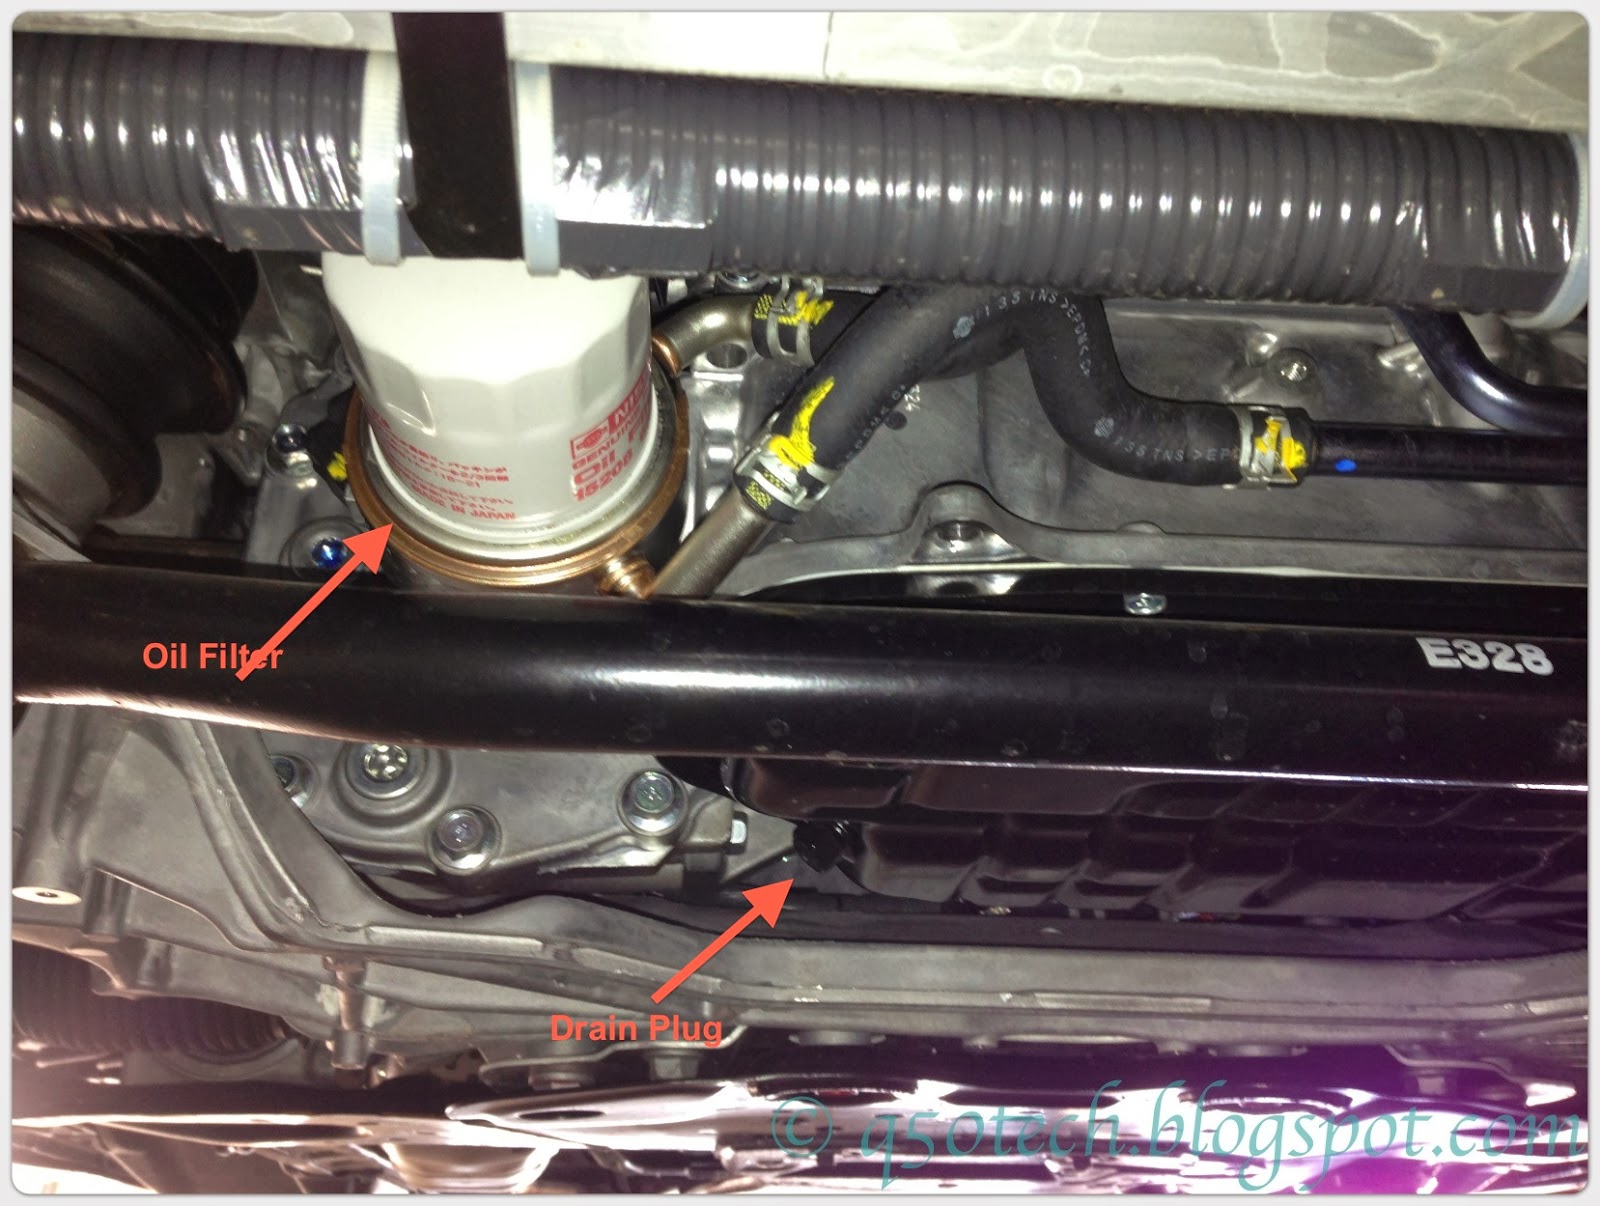
Place the oil drain pan underneath the engine, and unscrew the 14mm bolt and drain the engine oil. If you need to capture oil for testing, do that mid-stream. While the oil is draining, clean the bolt and remove the old crush washer and install the new washer, note the side the notch on the crush washer is, closer to the head.
 |
| Engine Cover Removed. |
Loosen the oil filter using the filter wrench, do not remove completely. Remove the wrench, and unscrew a few turns by hand, and let the oil drain from the filter. Once the oil slows down, remove the oil filter completely. Let the remaining oil drain.
|
| Draining the Oil |
Step 6: Filling the Oil
After the oil has drained (about 10 minutes), wipe the area around the filter port well, do not use any cleaning agents. Wet the gasket of the new oil filter with a film of clean engine oil. Install the oil filter. Follow install instruction on the filter. After the filter makes contact turn it 2/3 of a turn to get a good fit. Do not over tighten.
The oil will not completely stop dripping from the drain plug, so go ahead and install the 14 mm drain plug back in. Tighten to 35Nm torque. Clean up.
Fill 5 & 1/8 US qt oil using a funnel. Do not remove dip stick while filling oil. Replace the engine oil filler cap. I fill the 5qt jug at this point and fill the 1/8 if needed after step 10. Usually I do not need an extra 1/8 qt.
Step 7: Checking and Finishing Up
Start engine to warm up for a few minutes, check for leaks around filter and drain bolt. Stop Engine. Reset the maintenance counters.
Installation of the engine cover is reverse of removal. Put in the plastic fasters first then the 10mm bolts.
Remove the jack stand and then the jack and chuck.
Dispose of oil as per local laws. For most people this is a concern. Here is a simple trick. Drain the used oil back into the empty 5 qt jug, and take it to your closest oil change place. In WI, by law these places have to accept be "Free Oil Disposal Places". Most of these places have shop heaters that burn used oil or have a service that comes and collects oil and they get paid. Either way, they make money on the used oil. It should be free and easy.
After about 10 minutes of the engine being shut off on a level surface, check the engine oil level and top off if needed.
After about 10 minutes of the engine being shut off on a level surface, check the engine oil level and top off if needed.
Congratulate yourself on a job well done.!